Monday 29 February 2016

Reflection on my Construction Toy

When it came to finding a new idea for a construction toy, I could not come up with a idea that had not been made before without having to pick out elements from existing toys. However I came up with an idea, sadly my toy is limited to what you can construct out of it and the safety of the use of magnets. Due to my toy being made completely out of cubes, you could only connect the cubes together from 5 sides, also with some of the shapes being rectangular cubes there had to be one side that was would repel and one that would attract. This ended up being a very complicated thing to think about so when it came to the design of my animation and poster I tried to not go into super amounts of detail on the connect of shapes.

My poster was very simple it showed one example of what you could create out of the toy and a skeleton of the cubes. I thought I would do this because it shows the audience what the toy looks like and how inventive you can be when using the toy. I also clearly stated that the toy was for children ages 9+, I did this because that was the target audience we were set and with the magnet problem I thought that 9 would be a suitable age for change to not try and shallow the magnets. I also featured my logo in the poster because I thought that this would make my poster look more professional. 


This is my animation, I am very proud of it because I thought that it covered how the toy worked very well and it did it very smoothly. I feel like I have really gotten use to using Flash now and I only hope to improve with it. The animation tells the audience that the cubes stay together by the use of magnets and that the magnets are on each corner of the cubes. I think the use of the logo at the end of the animation makes it look like an advertisement for the toy and that was my goal from the start.

Creating a GIF for my toy

In our last lesson I started creating a GIF for my toy that showed off how it worked and what it could be made into. Again we had to used Adobe Flash to produce the animation so I found it quite hard to get to grips with the techniques that I haven't looked at for a few weeks. However I knew the basics so I could just get to work on my very basic animation slowly but to a good standard. Last lesson I only just started my animation so I did not finish it off however I have made good progress showing how the different parts connect to each other.

I also managed to speak to Steve about my blog and he gave me some feedback on my poster and what I had written. This was very helpful and gave me a chance to find out someone else's opinion on my work that I had done.

Wednesday 24 February 2016

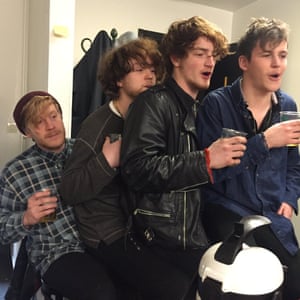
Viola beach Research


  • The incident occurred on the 13th of February were all four of the musicians died and their manager.
  • They were aged between 19 - 32
  • The incident occurred in Stockholm, Sweden 
  • Their car hit a road barrier and the fell more that 80ft off a bridge into a canal.
  • There is no found reason to why this happened
  • They are a British band that was on tour at the time
  • Not very well know, but were just beginning to become popular
  • All bodies were found
  • The barrier that they broke through was not hard to see and was 50 ft before the drop where they had supposedly fell through 
Viola Beach, who died in a car crash in Sweden.

Friday 12 February 2016

Peer Assessment

Cold Fusion - Jules Webb

I really enjoyed Jules film I thought that was very inventive and it had a very interesting concept. All of the camera angles and transitions were perfect and the fit with the films vibe. The film gave off a very spooky vibe and left me wondering what would happen next, straight from the get go you can already see that something is up with the first character and I think that was a very effective way to start the film. Also at the end of the film when it comes back to the same character and we see that he is clearly feeling uneasy allows the audience to relate with that character and think that they are not the only one that doesn't feel happy about what they just saw.

I liked the way that the camera effects in premiere made the camera look like it was a camera from a long time ago to fit with the time setting that it was based in. However the appearance of the news presenter did not fit with the time setting and kind of ruined that segment of the film. The brackets to the light and to the right became bigger and smaller at times and did not stay the same size, its such a small almost un-noticeable part but it ended up becoming quite apparent to me at times. For some reason the so brackets disappear for the final scene when they were present for the first, I don't know if this was down to the first scene being in the past and the last scene in the future but maybe this could have been something that could have been made more aware to the audience.

Rory's Evaluation based on my Production

I really liked the choice in music because it fit with the whole theme of the film. The narrative of the whole piece was very interesting and I enjoyed how it all came together. There could have a bigger variety of shots in each scene, some of the scenes looked a bit bare with only one or two shots throughout the whole thing. 

Analysis on my Project

Pre-production

I thought that my pre-prod went very well, I took my time with it and that meant that when it came to filming my piece I ended up already having a very clear vision in mind on how I wanted my film to look and sound. I spent a lot of time on my script making sure that it made sense and was well paced for the 3 minutes we had. 

I did my research and found some techniques that other short films used and I used them to my advantage when it came to filming particular scenes. I also had a very clear vision on how I wanted to characters to behave and react to things in my film. I showed my actors the character piece that I wrote so that they could build on from the characters back story. This was the same with the story board and shot list, I got all of them to look at the shots that I had in mind and we discussed weather or not they were the best plan of action or not, it was very useful to find out what the others on my team thought about some of the things that I had in mind and it ended up looking better than what I originally had in mind. This means that I am probably more of a, 'creative artist' type director like we talked about at the start of the project. Some of the things I wrote about the characters did not go ahead due to the whole film not looking quite right and sometimes making the characters out of place.

Production

When it came to my production the whole team worked very well with each other and we managed to get the whole thing filmed in a decent amount of time they were also very enjoyable to work with and we had a fun and good time shooting. Two out of the three scenes were shot outside so that meant that I did not have to pre book a place to film, this also made it less stressful. 

On the day of filming the weather was nice, it didn't really effect the lighting at all and made the actors and there clothes very easy to see, the setting didn't clash with the actors clothes. We had to set up a room for one of the scenes but this was easy to do and we managed to make the room look as much like a home as possible. The only problem we faced was with the college sliding doors, this kind of ruined the whole home feel and I tried to avoid filming that area as much as I could. 

The mic worked well and picked up everything that it needed to, we managed to work around the cars and the public as much as we could. When we moved from the college to the outside (Scene 2-3) we shot half of scene 3 and then I noticed that the microphone had been off for that entire scene. I had checked before on the two scenes before that but had forgotten on the last. This was a minor set back, however next time I am to shoot my own film or help with someone else's I will always make sure to check that all the equipment is on and is working properly. I think the only major problem we had when filming was the script, some of the actors found it hard to remember certain lines so we had to cut quite a lot, this ended up making the film look a bit jumpy with all of the cuts. Next time I would make sure that I give my script to all of the actors at least a week before so that they can be a bit more confident with their lines so that the cuts would be reduced majorly.

Post-production

When it came to editing, this was really may first ever time editing something with a lot of different shots so I found it quite hard to start off with. However I managed to get my head around the software, I experimented a lot with what certain things did so my audio/video and I ended up using some of these tools that premiere offered.

I think one of the most annoying things that I had to deal with is that, when we were filming we did not notice that the aspect ratio on the camera was set to a lower setting than usual. This ended up making the whole piece look a little more unprofessional. Ed tried to help me with my problem and we ended up adding bars around the top and the bottom of the video, this did not fully solve the problem but it did make it look a bit better. Next time I will make sure that the cameras aspect ratio is to the right setting and that everything looked up to par. 

We had shot a lot meaning that it took me quite a long time to go through all of the recorded footage. If I went to shot next time I would make it clear that what was being filmed as alright for the final cut, maybe I could do this by saying something after a recording has gone successful.

Conclusion

To conclude I thought that my whole project went well, there were a few minor and some major draw backs but I managed to overcome them and make a film that I am quite proud of. I think if I was to make another film I would defiantly make sure that I am fine with everything before I click film because I think the actual production side of things went the worst for me. I would also reduce the amount the characters have to say so that it doesn't become to script heavy like I thought this project came out as. Now that I know what I'm doing I will defiantly be more confident in the future when it comes to filming.

After looking at Jules film I have gathered a few things that worked quite well in his piece that I could incorporate in my project next time. One of these things is using no background music when something important is going on, for example in my project in scene two I could have cut the music off entirely when Jerry enters the room to create a bit more tension. Jules also used a variety of different shots in the end scene to create tension, if I had done this in my last scene I think that it would have had a bigger impact on the audience. Like Rory mentioned in him peer assessment I think that my project could have featured more shots for the same sorts of reasons as he stated.

Microphones I used in my project

RodeVideoMicWhen it came to shooting my piece, I already had my mind set on using a, 'Rode Microphone' I chose this because I only needed the characters voice and some mild background noise in my piece and this mic was great for the job. I say that because it ended up picking up a lot more background noise at times that I would have liked. A foley mic was not needed in my piece because there were no monologue or voice over need, also if I was to use it in my piece it would probably pick up every single type of noise being made outside and that would probably end up ruin the piece.

As I mentioned in my 'SWOT' tourist of other people in general could have effected what was picked up. However when we actually shot there was barely any people out in the park so it ended up working quite well and the audio was not ruined.  

Wednesday 10 February 2016

Product Homepage

When it came to taking photo's of my product I decided to take a variety of photos some that showed the product with its light on and other with the light off. I also took photos of the product from many different angles, I did this because I was not sure on how I was doing to theme my website. I only ended up using 4 of the images I took because I didn't want to cluster my homepage with lots of images of the same product and I thought that with the way I set it out on my wireframe it worked quite effectively.
When it came to my navigation I chose a simple design where I would have list of places that the user could go to. My phone navigation however is very different, I decided to incorporate a hamburger menu, so that it would be easier for the phone user to navigate around the site with a few simple presses instead of having to zoom into the webpage and clicking tiny text. As you can see from the images below I managed to make a very nice imagining of when the hamburger menu would actually look like if it was made into an actual webpage. 


My CTA can be seen on all the images here, I decided to place it on top of my products main image, I did this because it makes it very easy to find and looks very professional. It also made the image seem a little more busy, because without this CTA on top of the image it would have looked very boring and uninteresting.

My footer was very simplistic and was probably the most none detailed section of my webpage. It simply included a list of places that the user could go to just like my header (navigation). However I also included a copyright sentence at the bottom right of my webpage.

Sunday 7 February 2016

Designing our product and a poster for the product

In this weeks lesson we were given the time to design our new toy on illustrator and show how our toys worked. We were shown some new techniques on how to create 3D shapes and we could use this to show our audience our toy.

On our poster we had to show the toy and an example of what the toy could do, for my poster I decided to show the shapes that could be used to link to one another.

I showed a skeleton of the shape so the audience can have an idea of what the shapes would look like from all angles, it also gives off a building/ construction feel to the poster. I featured a logo for my toy that can be seen at the top right of my poster, that again featured a shape skeleton. I also included a image on how the shapes should be connected by using lines to show that the shapes can link up, I also made it obvious to the audience that there were magnets inside the toy, so they could understand how the shaped connect to each other. 

My demonstration of a already built model was of a man, I did this because it is quite easy to see and doesn't look half bad, this is good because if a customer was to see a constructed model and it did not look good then they would probably not want to buy the product. Having a already constructed model allows the customer to see what they can make with the tools they have been given.


Thursday 4 February 2016

Research for music indent

When it comes to my project I have to either record my own or find a musical indent. This indent has to relate to the topic that I will be talking about in my news story. 

I have had a looked at some radio indents from other companies like 'NBC' and 'BBC World' when it come to the NBC indent it was very basic it featured a piano that held its notes while it slowly went up the keyboard. This gave off quite a calm and relaxed vibe and if it was the indent they would play to start off their show in the morning like the video suggests they are definitely welcoming their audience in the right way. The BBC world used chimes that were probably from the Big Ben due to BBC meaning British Broadcast Corporation, I think that this was a very nice touch and definitely give the audience an indication that it is a British based company. This indent sounded like it was serious and that what you were going to hear after was very important and high status.

After looking at both of these indents I have gained an idea on what sort of indent I want to find for my project, I will try and go for a indent that is quite calm but does not sound too relaxing. My topic is based on the recent incident with a Viola Beach, and my of radio station is based around music. So I will have to make sure my indent fits nicely with both of these factors.

http://www.purple-planet.com/ The audio on this site has the potential to be the music used for my indent because my radio is focused on people who like music and the audio that is available is something that has quite a lot of soul packed into it.

Tuesday 2 February 2016

Broadcast

History of Television

In the early 1920's the first mechanical television was invented and sold to the public by Charles Jenkins. June 25th 1951 was the date when the first mechanical television was released to the public. In May 1954 the fist all-electronic colour Television set was sold to the public. 1990 was the year where Hi-Def was introduced and 5 years later the Telecommunications Act replaced the old 1934 laws.

What is Ofcom?

Ofcom is a communication regulator that regulates; TV, Radio, Video on demand, telecoms, phones, postal services and the airwaves that wireless devices use.

An example of what they regulate

Ofcom sets down lots of rules that TV and Radio broadcasters have to follow to unsure that children are not subject to unsuitable content. One rule that the say broadcasters have to follow is that after 9PM content that maybe unsuitable for children can be shown. This is because this is the time when most young people go to bed and it allows broadcasters to still put up content that would be allowed to be aired if this rule was not put in place. Anything that children could copy; swears, violence and harmful behaviour is regulated, as you can see this is the same sort of thing that the ASA does to protect children.

Difference between print and broadcasts

When it comes to print and broadcasts, print is always the place you have to go to fro more information. This is because broadcasts are aimed towards everyone, so the language they use and the amount of topics covered has to be significantly reduced. However with print articles can go into much more detail and can use must more complex words, this is because people who decide to read article want to know what is going on and does not just want to find out the bits and pieces.

This is what one of the articles looks like on the telegraph, you can clearly see that their over view covers a lot of things that are only going to be cover more in-depth further on in the article. The language used is also very complex and more sophisticated. The whole article is about 800 words long and tell the reader almost everything that they might want to know. 


Difference between Radio and TV

Radio nowadays is something that people use to have on in the background when they are doing activities, they are less likely to but fully immersed in the content compared to TV. Another massive difference between them is that radio isn't visual, everything is all audio based, this means that when something is being happening in the studio, like a reaction to news has to be portrayed to the audience in the different way than it would with TV. Radio also allows the audience to use their imagination and imagine what may be happening in the studio so a more expansive vocabulary can be used.

Audio Equipment

In our last lesson after we had finished writing up our blog posts, we were set off to experiment with the different audio equipment provided by the college. I was quite unsure about what I wanted to do for my project, however as seen in my blog post I had the 60 second news report in mind. I decided to look at all of the different possibilities of audio when it came to using the equipment just in case I happened to change my mind and go for the Instagram video or the radio sitcom. 

I decided to stay around Issy due to her also not being quite sure on what to do either. We looked at the various different types of portable mics, listening back to the audio that we recorded using the; foley, boom and normal microphones. It was apparent that these mics would be great for use outside and if or project featured something that had to be recorded outside we knew the proper equipment to use and how to use it correctly. I also glanced at the audio recording equipment that the others were using and practicing with, it looked all very complected but from what I heard from the others the audio that was picked up sounded great. These types of mics would probably be ideal for my news report, so I will be sure to check them out the next time I get the chance.

Audio Equipment Testing

When it came to the recordings it sounded like the audio was best picked up when there wasn't a cover that protects the mic from the wind. The audio that we recorded inside came out the best in my opinion because it was clear to hear and there were not a lot of things that overpowered my voice. However it came out quite echo like and I think if I were to use the foley microphone I would use it in a room where noise cannot bounce. 

The foley mic with the protective cover and the boom mic made my voice sound a bit muffled and unclear, if I were to use it in my piece I would have to turn up the recorded audio to match the volume of everything else. If I had to choose between the both of them I would choose the boom mic for the shier reason that no wind was picked up on the microphone. 

Lastly I used the foley microphone without a cover, the result of this was quite a loud sound of the wind hitting the mic, if I were to use this in my project it would end up sounding very unprofessional and annoying to the audience.